Thursday, December 15, 2016

Soft Sweet Cinnamon Rolls

Here's the recipe for the cinnamon rolls we had at card class. 
2 pkg dry yeast mixed with 1 c warm water & 1 t sugar. 
Let set til bubbly.
While setting mix:
1 1/2 c lukewarm milk
1/2 c sugar
1 egg
1 T salt
1/2 c soft butter
Mix well then mix into yeast mixture. 
Add 6-61/2 c flour 
Mix then knead til soft dough. 
You can then make them into cinnamon rolls or dinner rolls! 
Frosting:
1 cube butter
Cook on med heat till browned then add powdered sugar & a bit of 1/2 n 1/2 til consistency is a runny frosting. Frost cooked cinnamon rolls.
These are the BEST dinner rolls!!

Monday, December 12, 2016

Card Class Saturday

We had such a great time at card class on Saturday!!  Ten great Christmas cards, this awesome sausage potato soup & fresh baked cinnamon rolls!!
Better get your spot for January class!!
The date is Jan 14!!

Friday, December 9, 2016

Sweet Sugarplum Christmas

WOW!! How simple is this?!?
Just two stamps, one color of ink, two colors of card stock + white & some sparkly ribbon & you've got a great card to give someone special!!
It doesn't ALWAYS have to be complicated to be beautiful!
The color combo I used was Sweet Sugarplum & Always Artichoke. Very nice for a Christmas card & definitely this months "5 second card"!

Sparkly Holiday

Oooooh the "Purple Lady" is gonna love  this one!!
Delicate ornament framelits paired with Blackberry Bliss is so elegant!
Add in Glimmer paper & rhinestones and you have a stunning price of art work that's a mini gift to anyone who receives it!

Wednesday, December 7, 2016

3 Candle Card

Such an elegant card....
And so simple to make!
Here's what I used :
Little Flower Punch
Bird Builder Punch
Leaf Punch or Thinlit
Pearls
Holly Berry Embossing Folder 
Candles are 1" wide & heights are 2 1/4", 2 1/2" & 2". 
Fun to make but very elegant!

Snow-face Gift Card Holder

S-I-M-P-L-E!!!
Softly Falling embossing folder, 3/4" circle punch, free hand cut "nose" & wide ribbon "scarf" is all there is to this card!! 
Then....if you want you can see below for the gift card holder inside. But it certainly would do as a "non-gift card holder" card as well!

Card & Tag or Gift Card Holder

A gift card can look a little cheap... Not that it is but if you wanna put a little more "uuumpf" into your gift cards this year here's the way to do it. 
Cut your CS in 1/2 lengthwise & fold in 1/2. Round the bottom corners. If your rounder won't go through double thicknesses (mine won't) then just press hard & it will leave enough of an impression that you can then follow the impression with your scissors.  On the card front, score down 1-1 1/2" (depending my on the look you want) 
Cut & round corners on DSP & adhere. Stamp greeting with white ink & embellish as you wish. Adhere edges of card so it will hold tag or gift card. Create tag & embellish. 
A great way to dress up a gift card, wouldn't you say?

Shimmery Star

Did you really think a Christmas card making month would go by without a blue & silver card? I didn't think so. 
What can I say? This card is lovely!! No it's not an original but it's just lovely!
The best part? It's really really super simple! And this time of the year...we love simple, right?!? 
I used Night of Navy CS with Whisper White. I embossed the N o N with a non Stampin Up embossing folder that looks like a sheet of music.  I then used the Starlight Thinlits to cut out a star (top one in this picture) out of a Silver Foil sheet. The bottom one in this picture I used to cut the center star/snowflake out of Dazzling Diamonds glimmer paper. Originally I was supposed to use Silver glimmer paper but alas.... I had none so substituted the Dazzling Diamonds.  
Here's a closeup of the finished product. 
I added a Rhinestone to the center for a little extra glimmer. 
Then add some silver ribbon to the top of the sentiment & you are done!! See why I love blue & silver?


Merry Christmas Banner

The Banners for Christmas set is such an awesome set! I love the big candy cane so decided it was a MUST for this months class!
I used Pear Pizzaz & Real Red together. Kind of an unlikely pair but I like it!!
So you will want to flag the white CS first. Mostly because you don't want to stamp your candy cane then cut into the bottom of it when you cut your flag end.  After you have flagged your Whisper White then stamp your images & color your berries with a marker. Add your ribbon (strangely enough this is Cherry Cobbler ribbon & looks great!!) then mount your white on your red keeping the tops flush that way it gives you room to flag the red at the bottom. 
Stamp & cut (with Big Shot) your banners & adhere them with puffy tape to add dimension. Cute & mailable as well!! 

Cookie Cutter Gingerbread Man

Sweet gingerbread.... Ahhh it speaks of Christmas, doesn't it? 
And here's a card that does just that as well!! Real Red, Crumb Cake & Chocolate Chip make this card a real treat! I used the Candy Cane Lane DSP & the Cookie Cutter Builder punch. I made this card without a sentiment so it could be used other than Christmas, but you certainly could add a "Merry Christmas" to it!!
Isn't this paper COOL?!? 
Here's a quick closeup of the DSP:
And the backside:


Tuesday, December 6, 2016

Star Wreath

Here's a different twist on the traditional wreath! Use your scraps & a bitty star punch to create this darling card. 
I used the bow from the Holly Berry punch. So cute!
I also used the Stars embossing folder for the background. 
Simple & cute ...that's how we roll at card class!

Match Book Hot Chocolate Packet

HAPPY CHRISTMAS EVE!!
Looking for a dandy little gift? Something extra to tuck in a gift basket? A gift topper? Look no farther! This is the cutest little hot chocolate (or spiced cider) pouch EVER!!
Cut your card base at 4"x11". Score at 10" & 4 3/4". Fold top down & crease well. Shake packet of hot chocolate down & tuck top edge under flap. Being careful not to punch into where the hot chocolate granules can leak out, punch two holes thro the flap, packet & then the back of card. Thread ribbon through holes & tie in knot. Add leaves & berries as desired. 
Decorate & embellish front of card. I made a slit across the "hot chocolate " in the cup so I could insert the steam & candy cane in it. So simple & soooo cute!! A great gift to add to another or to stand alone!!


Monday, December 5, 2016

Pretty Candle Gifts

All dressed up & ready to go!!
Super cute and simple gifts for all my sweet ladies in December card class.
Just take a plain candle & cut paper to go around the perimeter. Attach ends with hot glue.
Then melt paper into candle slightly with a heat gun or blow dryer. The paper will turn wet looking & waxy. 
Then add ribbon & embellishments.  So fun & easy to make! Can't wait to see if they like them!!

Thursday, November 24, 2016

HAPPY THANKSGIVING (& Taco Soup)

Happy Thanksgiving, friends! How I wish we could have a big ol dinner...all of us...together! Wouldn't that be fun? 
Since that's not possible I wanted to wish you the happiest day possible today to you & yours!!
AND since I haven't posted the Taco Soup recipe I figured I better get it done!
Plus it'll be a great way to use up your extra turkey!! Super easy and very tasty. You can use your own homemade cream soup if you so desire.
Here it is:


Tuesday, November 15, 2016

Grandma Barkers Apple Pie

Grandma Barker made the BEST apple pie! She didn't measure...she felt! So one day not long after my now 24 yr old was born I decided to decode the recipe!! She started making apple pie at my request and before she put ANYTHING into the bowl I made her measure it...after she felt how much or how heavy. I, therefore, am the only grand daughter who decoded the recipe that she only had in her head!
Here....it....is....for....you .....now:
The pie crust is THE most important  part of the pie! 
3 c flour
1 1/2 c butter flavored Crisco (NO substitutes) 
Mix together well with hands, fork or pastry cutter. Add:
8 T cold water 
Being careful not to over mix, combine be. Break off piece & roll out for pie.
Pie filling:
I use whatever apples are available! About 7 per pie. So there you have it! No secret there!!
BUT here's what I DO do...
I peel & slice then put all in a huge skillet & cook with one cube of butter. Then as it begins to make some juice I add brown sugar, cinnamon, nutmeg, cornstarch  & flour (approx.1 heaping tablespoon each, more if apples are juicier) and let that cook til tender. This does two things:
1) you get to see when they are tender  which takes away that mystery of not getting the apples done enough & the crust too done!
2) you get to taste the sweetness "level" of your filling before you put it in the pie.
All apples are different. If you use Granny Smiths you will need ALOT more sugar than if you use ...say..,Fujis! So instead of winging it & hoping it's sweet enough or  taking that first bite of pie & finding out its "stick in the throat" WAY TOO sweet... You do it all on the stove before you put your apples into the pie! 
Load up your pie shell & put your top decorative shell on & seal. At this a point brush milk or cream on the crust & sprinkle some coarse sugar over top. Bake at 350 degrees for 30-45 minutes or until top crust is golden brown! You have just made the BEST pie in the world!...compliments of Grandma (Eunice) Barker!

Friday, November 11, 2016

Purple Snowflakes

My "Purple Friend" will love this card!!
Just some simple patterned paper for the backdrop. I used 1 1/4" Scalloped Circle punch & 1" Circle punch for the snowflakes. The big flag piece is stamped with your sentiment then embossed with the Snowflake embossing folder. A great card...easy to reproduce & do in assembly line fashion!

Fancy Fold Christmas

Here's a lovely fancy fold card for this months card class. Fun and...truly it's simple!! See explanations/instructions below:
You can decorate the panels as you wish!

Here's a top view:
Here's the instructions:
And here's the dimensions for the decorative panels:


Wednesday, November 9, 2016

Jolly Old St.Nick

Simple card, ladies!! Probably this months "5 Second" card!! 
Merry Moments DSP and an "off" set that's not SU! are featured here.  Love the Cherry Cobbler & Smoky Slate combo tho!!
Super easy but very cute!!

Snowflake Christmas

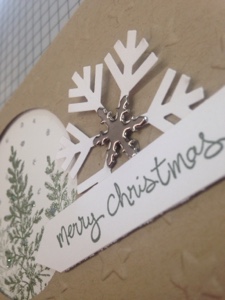
A snowy pine tree scene...what could be more Christmas-y than that?
Crumb Cake & Always Artichoke are a great combo here, I think!

I used the 2 1/2" circle punch for the window & the Star embossing  folder for the front.  The stamp was from Lovely as a Tree. I thot it turned out simply wonderful!