Thursday, November 24, 2016

HAPPY THANKSGIVING (& Taco Soup)

Happy Thanksgiving, friends! How I wish we could have a big ol dinner...all of us...together! Wouldn't that be fun? 
Since that's not possible I wanted to wish you the happiest day possible today to you & yours!!
AND since I haven't posted the Taco Soup recipe I figured I better get it done!
Plus it'll be a great way to use up your extra turkey!! Super easy and very tasty. You can use your own homemade cream soup if you so desire.
Here it is:


Tuesday, November 15, 2016

Grandma Barkers Apple Pie

Grandma Barker made the BEST apple pie! She didn't measure...she felt! So one day not long after my now 24 yr old was born I decided to decode the recipe!! She started making apple pie at my request and before she put ANYTHING into the bowl I made her measure it...after she felt how much or how heavy. I, therefore, am the only grand daughter who decoded the recipe that she only had in her head!
Here....it....is....for....you .....now:
The pie crust is THE most important  part of the pie! 
3 c flour
1 1/2 c butter flavored Crisco (NO substitutes) 
Mix together well with hands, fork or pastry cutter. Add:
8 T cold water 
Being careful not to over mix, combine be. Break off piece & roll out for pie.
Pie filling:
I use whatever apples are available! About 7 per pie. So there you have it! No secret there!!
BUT here's what I DO do...
I peel & slice then put all in a huge skillet & cook with one cube of butter. Then as it begins to make some juice I add brown sugar, cinnamon, nutmeg, cornstarch  & flour (approx.1 heaping tablespoon each, more if apples are juicier) and let that cook til tender. This does two things:
1) you get to see when they are tender  which takes away that mystery of not getting the apples done enough & the crust too done!
2) you get to taste the sweetness "level" of your filling before you put it in the pie.
All apples are different. If you use Granny Smiths you will need ALOT more sugar than if you use ...say..,Fujis! So instead of winging it & hoping it's sweet enough or  taking that first bite of pie & finding out its "stick in the throat" WAY TOO sweet... You do it all on the stove before you put your apples into the pie! 
Load up your pie shell & put your top decorative shell on & seal. At this a point brush milk or cream on the crust & sprinkle some coarse sugar over top. Bake at 350 degrees for 30-45 minutes or until top crust is golden brown! You have just made the BEST pie in the world!...compliments of Grandma (Eunice) Barker!

Friday, November 11, 2016

Purple Snowflakes

My "Purple Friend" will love this card!!
Just some simple patterned paper for the backdrop. I used 1 1/4" Scalloped Circle punch & 1" Circle punch for the snowflakes. The big flag piece is stamped with your sentiment then embossed with the Snowflake embossing folder. A great card...easy to reproduce & do in assembly line fashion!

Fancy Fold Christmas

Here's a lovely fancy fold card for this months card class. Fun and...truly it's simple!! See explanations/instructions below:
You can decorate the panels as you wish!

Here's a top view:
Here's the instructions:
And here's the dimensions for the decorative panels:


Wednesday, November 9, 2016

Jolly Old St.Nick

Simple card, ladies!! Probably this months "5 Second" card!! 
Merry Moments DSP and an "off" set that's not SU! are featured here.  Love the Cherry Cobbler & Smoky Slate combo tho!!
Super easy but very cute!!

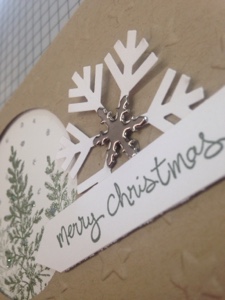
Snowflake Christmas

A snowy pine tree scene...what could be more Christmas-y than that?
Crumb Cake & Always Artichoke are a great combo here, I think!

I used the 2 1/2" circle punch for the window & the Star embossing  folder for the front.  The stamp was from Lovely as a Tree. I thot it turned out simply wonderful!


Tuesday, November 8, 2016

A Fresh Batch of Cookies

A cold winter day....Christmas is on the way....and you have a fresh batch of gingerbread man cookies in the oven! Lovely scene, huh? 
Well here's proof! 
Such a fun card to send to send to someone special next month. 
DSP to the rescue too! Love having a lot of DSP on hand for these types of cards. 
The colors I used were Chocolate Chip, Cherry Cobbler & Old Olive. 
I debated whether to color the squiggles & eyes on the cookies ...or not...still not sure. Definitely gave them more color but...

Skeleton Trees

"In EVERYTHING give thanks..." Not just the good things....the things that makes us feel whole & well...happy & strong... But in ALL things! This card is a beautiful reminder of just that....
I used "Lovely as a Tree" stamp set & then used the little splotches from "Gorgeous Grunge" & "TimelessTextures" to create the "leaves".  
I never realized how pretty Cajun Craze was coupled with So Saffron either! Makes me see rich beautiful fall sunshine! 
I also sprayed a bit of glitter on the leaf after I stamped & sponged it. You can get this at any craft store. Beautiful!


One Thankful Turkey!

My favorite time of the year!! 
THANKSGIVING!!
And what better way to celebrate than by making a bunch of these cute little guys to give to those who you are so thankful for!
And the plus is that he's SUPER easy! 
Here's the list of punches: 
1 3/4" Circle punch -body
1 3/4" Scallop punch - wings
Word Window -feet 
1/2" Circle punch -whites of eyes
1/4" (or standard hole punch) Circle punch -pupils
Large Oval-head & all feathers 
Itty Bitty Heart-beak, wattle & "hands"

Monday, November 7, 2016

Sanded, Multi-Colored & Blessed

Ahhhh... The warm, rich colors of Autumn!
A sweet little 4x4 card for you...
3"square top mounted piece with 1 1/2" squares of various patterned paper. Great way to use scraps...by the way!
After the patterned pieces are mounted on the Old Olive, I then ran it through the Big Shot with the Lattice Embossing folder. 
Finishing touches....
A single leaf...
A big button...
Twine...
Gold safety pin...
And a sentiment tag ...
Darling & a bit rustic!

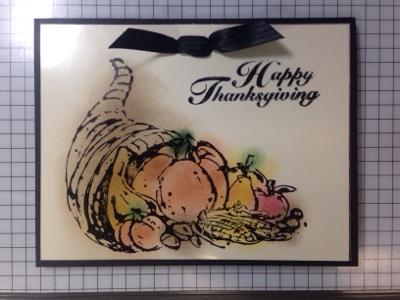
Clear Overlay Cornucopia

Here's a great way to get some color on a card without stressing about "staying in the lines"!
Stamp your image on clear overlay sheets with Staz-On. Attach to your piece that will be mounted on your card base. You could do this with ribbon as I did or use brads. After you have everything attached you can then lift the clear sheet and apply your color with daubers or sponges. Doing it this way you can put your clear sheet up & down to assure you're getting the color in approximately the right vicinity!

But DONT STRESS IT!! It's supposed to be messy & random!! Lovely!!

Glossy Fall Leaves

Every once in awhile I just gotta pull out the glossy paper & sponges because I just love the look of those together! 
Today is one of those days....
Daffodil Delight, Pumpkin Pie & Old Olive dabbed & sponged on glossy paper just makes my "Fall lovin" heart happy!! 
Stamp some random fall leaf skeletons over top & what a lovely look!!